Milestones are significant events in the life of an animal and they are also an important part of your recordkeeping for all animals you take into your care. TYR enables you to record milestones for animals while they are in your care and even after they are adopted, transferred, or released.
Important Information about Milestones
When you add a new animal record to TYR, the system automatically creates two milestones from information you enter on the New Animal screen:
-
Birth, using information you entered in the "Approx Age" or "Actual Birth Date" fields
-
Intake, using the date you entered in the "Date of Intake" field
Here are the other milestones you can add to animal records:
|
Milestone
|
Use when:
|
Grid location after assigning Milestone
|
|
Adoption
|
One of the PCOs in your database formally adopts an animal
|
Former Resident
|
|
Adoption Return
|
An adopter is no longer able to keep the animal and returns it to your shelter
|
Current Resident
|
|
Foster
|
An animal in your care is placed in a foster home while awaiting adoption
|
Current Resident
|
|
Foster Return
|
A foster "parent" returns an animal to your shelter
|
Current Resident
|
|
Lost
|
An animal in your care has gone missing
|
Former Resident
|
|
Found
|
A missing animal in your care has been found and returned to your shelter
|
Current Resident
|
|
Released
|
An animal that has been in your care is released back into its natural habitat
(Note: Once you save this milestone, you cannot change it.) |
Former Resident
|
|
Death
|
An animal in your care has died
|
Former Resident
|
|
Note
|
You simply want to add a note to the animal's record
|
Either
|
|
Returned to Owner
|
One of the PCOs in your database is the animal's owner and takes the animal back
|
Former Resident
|
|
Reintake
|
An animal that was Returned to Owner is brought back to the shelter
|
Current Resident
|
|
Transfer
|
An animal that has been in your care is transferred to the care of another shelter
|
Former Resident
|
As you begin to add milestones, you will notice that sometimes only certain milestones in the list are available for selection. The available choices depend on the animal's most recent milestone associated with some type of movement, such as when you take the animal in (Intake) or when you place it in a foster home (Foster). For example, if the most recent milestone is Adoption, then Adoption Return, Death, Note, and Reintake will be available for selection and the others will be greyed out; if the most recent milestone is Foster, then Foster Return, Lost, Released, Death, Note, Returned to Owner, and Transfer will be available for selection; if the most recent milestone is Transfer, then Note and Reintake will be available for selection; and so on.
-
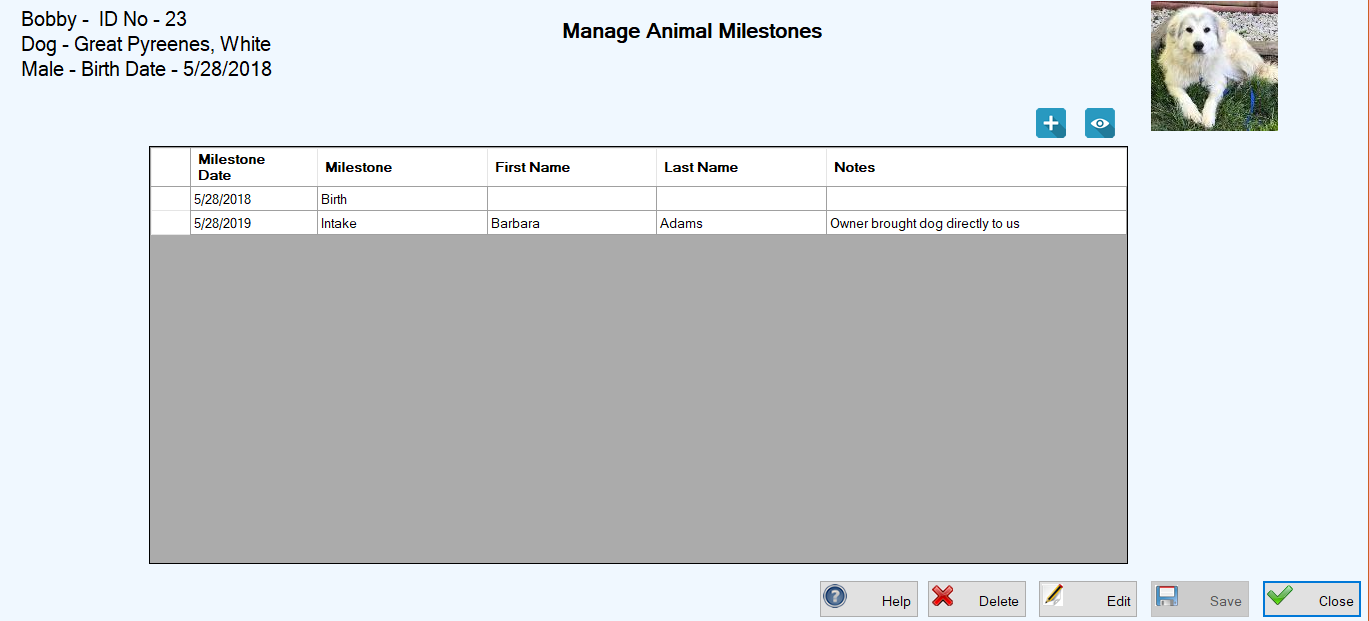
On the TYR Home Screen under Modules, click Animals to open the Manage Animals screen.
-
In the center grid on the Manage Animals screen, select the row containing the animal to which you want to add a milestone by clicking the cell at the farthest left of the row.
-
In the row of blue buttons to the upper right of the grid, click the Animal Milestones button (
 ) to open the Manage Animal Milestones screen.
-
Click the Add New Milestone button (
 ) to open the New Milestone screen.
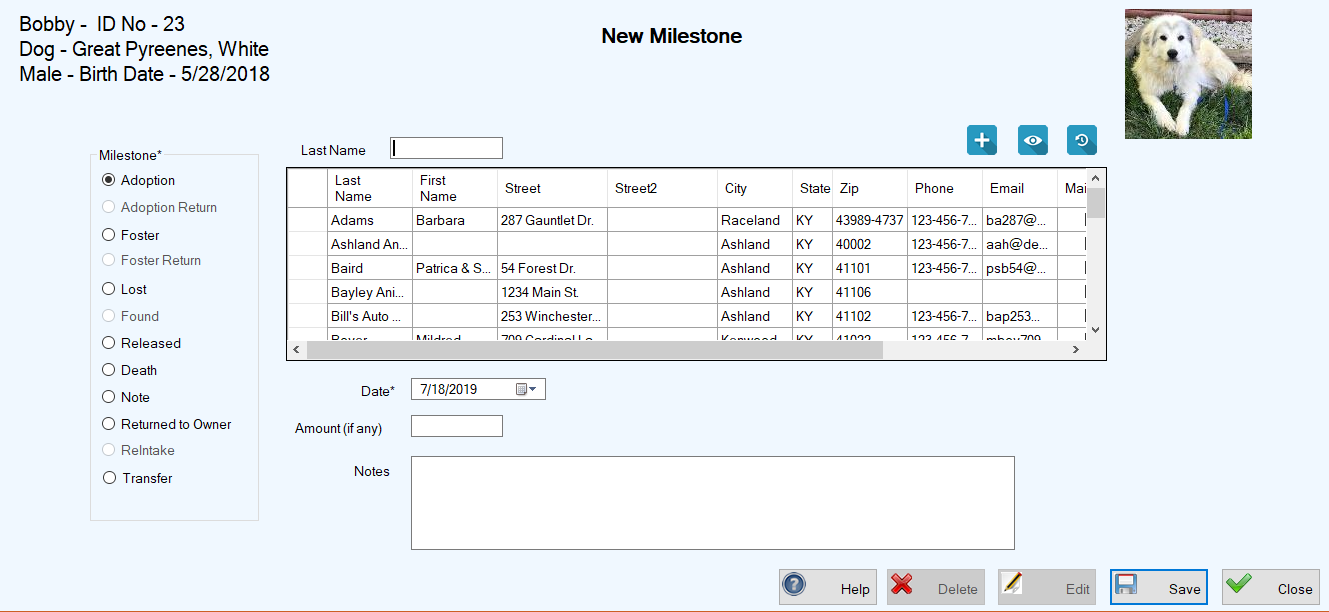
Important Notes:(a.) In this example, the most recent prior milestone is "Intake" so certain other milestones in the list on the left side of the New Milestone screen are not available for selection because they are not relevant at this point.
(b.) As you can see in the image above, certain milestones require the association of a PCO record to identify the person, company, or organization involved (adopter, foster home, transfer recipient, etc.), so the center grid displays a list of all PCO records in the database, with a "Last Name" search field above the grid to help you narrow down your search for the correct PCO. You can also use the blue buttons at the upper right of the grid to add a new PCO record ( ) from within this screen, as well as view and edit details of an existing PCO record (
 ) and view historical information about a PCO (
 ). If you forget to select a PCO and the milestone requires one, you will be reminded when you click the Save button and the message "Please select a PCO" appears at the lower left corner of the screen.
-
From the list of Milestones on the left, select the applicable one. (Note: Depending on which milestone you select, certain fields in the middle of the screen will either become active or inactive, while others might change from optional to required.)
-
If the selected milestone requires an associated PCO record, the Last Name search field will become active. When this happens, begin to type letters of the last name in the Last Name field until you see the name in the grid, and then click the cell at the farthest left of the row containing the PCO name to select it.
If there is no record for the PCO, follow these steps to add one:(a.) Click the blue Add New PCO () button just above the center grid on the right. The Person(s), Company or Organization screen appears.
(b.) Perform Steps 3 through 15 for Adding & Managing PCO Records. You are returned to the New Milestone screen, where your new PCO record appears highlighted in the center grid, and a confirmation message appears in the lower left corner of the screen.
-
In the Date field, type in or use the Date Picker to select the date the milestone occurred.
-
The Amount field becomes active for certain milestones for which you might receive donations or fees (Adoption, Returned to Owner, Transfer). Enter the amount of any fee or donation associated with this milestone.
-
If Notes has an asterisk, this field requires an entry, so type in all important information regarding this milestone. If there is no asterisk, an entry in the Notes field is optional but usually helpful for future reference.
-
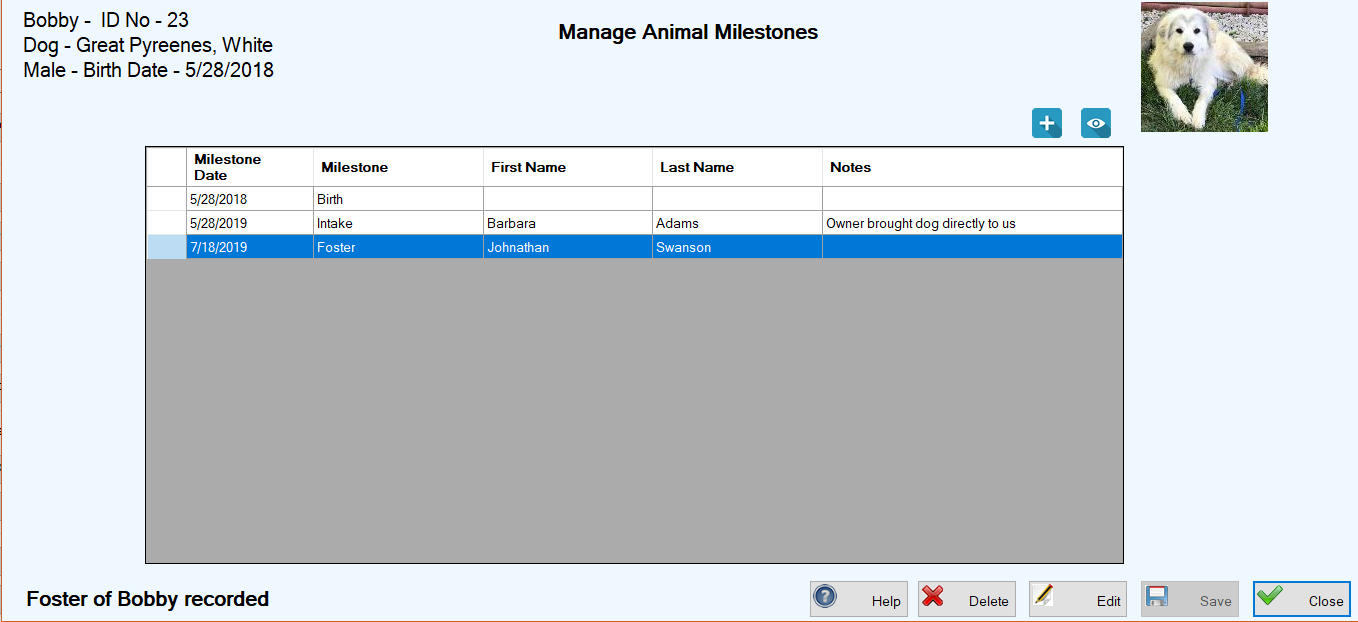
Click Save. You will be returned to the Manage Animal Milestones screen where the new milestone appears in the grid and a confirmation message appears at the lower left of the screen.
Top of page
-
On the TYR Home Screen under Modules, click Animals to open the Manage Animals screen.
-
In the center grid on the Manage Animals screen, click the cell at the farthest left on the row containing the animal whose milestone you want to edit.
-
In the row of blue buttons to the upper right of the grid, click the Animal Milestones button () to open the Manage Animal Milestones screen.
-
In the center grid on the Manage Animal Milestones screen, double-click the cell at the farthest left on the row containing the milestone you want to edit. The detail screen for the milestone will open with all editable fields ready for you to make your changes.
-
Enter your changes and click Save. You will be returned to the Manage Animal Milestones screen where you will see a confirmation message in the lower left corner.
Top of page
Important Notes: With the exception of Notes, Milestones must be deleted in sequential order, beginning with the most recent, because of their interdependency. To delete a Birth or Intake milestone, you must delete the entire animal record.
-
On the TYR Home Screen under Modules, click Animals to open the Manage Animals screen.
-
In the center grid on the Manage Animals screen, click the cell at the farthest left on the row containing the animal whose milestone you want to delete.
-
In the row of blue buttons to the upper right of the grid, click the Animal Milestones button () to open the Manage Animal Milestones screen.
-
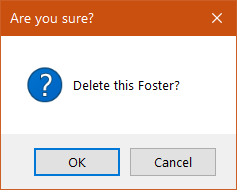
In the center grid on the Manage Animal Milestones screen, click the cell at the farthest left on the row containing the milestone you want to delete.
-
Click the Delete button. You will see a confirmation popup window with a message similar to this ("Foster" indicates the specific milestone type you are deleting):
-
To complete the deletion, click OK. You will be returned to the Manage Animals screen, where you will see a "Milestone Deleted" confirmation message in the lower left corner.