Adding & Managing Vaccinations
TYR provides tools to record vaccinations given to the animals in your care and to set and view reminders for the dates those vaccinations are due again. (Note: The procedures for setting, viewing, and clearing reminders are explained in a separate section.)
This page describes the following procedures:
-
On the TYR Home screen under Modules, click Animals to open the Manage Animals screen.
-
In the center grid, locate the animal that received the vaccination and select the record by clicking the cell at the farthest left on the row containing the animal's information.
-
On the right side of the screen under Animal Health, click the Vaccinations button to open the Manage Vaccinations screen.
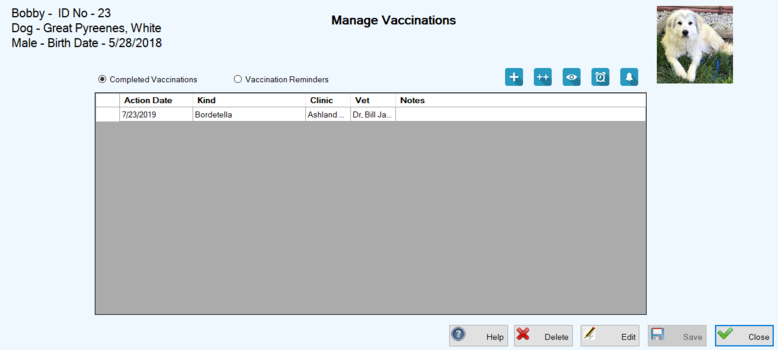
IMPORTANT NOTE: This screen has a dual purpose:
(a) Manage records of completed vaccinations, allowing you to view, edit, and delete them (covered on this page); and
(b) View, set, and manage vaccination reminders (covered in the REMINDERS section).
-
Click the Add New Vaccination button (
 ) to open the single Vaccination screen.
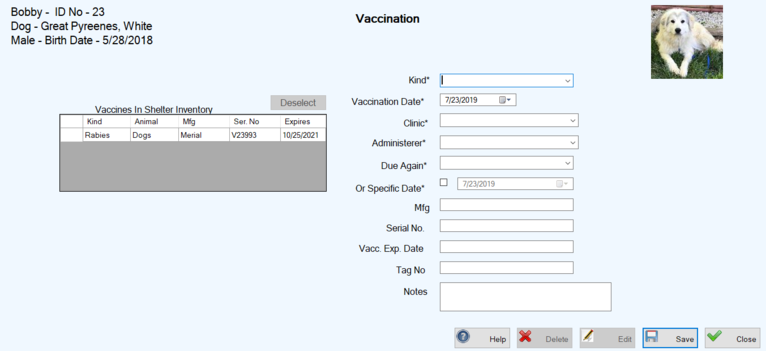
The data in the "Vaccines in Shelter Inventory" grid on the left is drawn from the table established during system setup for Creating & Managing Vaccines in Inventory. When you select a vaccine in the grid, the action automatically populates the relevant information in the fields on the right side of the Vaccination screen.
-
Enter the Kind of vaccine by using one of these three methods:
(a) Select a vaccine from the "Vaccines in Shelter Inventory" grid on the left by clicking the leftmost cell on the row containing the vaccine details.
OR(b) Click the down arrow in the Kind field and select from the list of vaccines you created during system setup for Creating & Managing Vaccination Types.
OR(c) Type the name of the vaccine in the Kind field if it doesn't appear in the drop-down list or in the "Vaccines in Shelter Inventory" grid. (Note: Any vaccine you enter manually in the Kind field is not automatically stored in the Vaccines list for future selection. If you want it to appear in the drop-down list in the future, don't forget to follow the procedure for Creating & Managing Vaccination Types. If it's a vaccine you store in inventory, follow the procedure for Creating & Managing Vaccines in Inventory to add it to that list instead.)
-
In the Vaccination Date field, type the month, day, and year the vaccination was given or use the Date Picker to select the date. (Note: For vaccinations, the system will accept only today's date or an earlier date.)
-
In the Clinic field, type the name or select one from the drop-down list that was created from the PCO records for companies or organizations for which you selected the "Animal Clinic or Hospital" checkbox.Important Notes:(a) The system does not create a PCO record for a new clinic name that you type in manually, so if you expect to use this clinic name again, we recommend creating a new PCO record for the clinic as soon as you finish entering the vaccination for this animal so you won't forget to do it.)(b) When you select a vaccine from "Vaccines in Shelter Inventory," it usually means you or someone else at the shelter has given the vaccination, so the entry in the Clinic field should be the name of your shelter. To save keystrokes in the Clinic and Administerer fields, you can set up a PCO record for your shelter and designate it as an "Animal Clinic or Hospital" and then add "Staff" as a generic "Veterinarian" for your shelter in the system setup for Adding & Managing Veterinarians.
-
In the Administerer field, type the name of the person who administered the vaccination or select a name from the drop-down list that was created during system setup for Adding & Managing Veterinarians. (See Important Note (b) in Step 7 above if the Administerer is a staff member at your shelter.)
-
Decide if you want to use the Due Again or Specific Date field to establish an automatic reminder for a future date from today.
(a) If you want to use the Due Again field, make a future date selection from the drop-down list. (Note: When you make any selection other than "None," TYR automatically creates a reminder for a future date from today that coincides with your selection, e.g., the selection of "2 weeks" for an entry made on July 23, 2019 creates a reminder for August 6, 2019, exactly two weeks later.)
 (b) To choose the Specific Date field instead of the Due Again field, click the checkbox and then type or use the Date Picker to select a future date.
-
The Mfg (manufacturer), Serial No., Vacc. Exp. Date, Tag No, and Notes fields are all optional, so make entries as desired. (Note: If you selected one of the "Vaccines in Inventory" for the Kind of vaccine, the Vaccine Expiration Date field on the Vaccination screen will always have an entry because the expiration date is required when you set up Vaccines in Inventory. If you included Manufacturer and Serial Number when you set up the Vaccines in Inventory, that data will also appear in the relevant fields on the Vaccination screen.)
-
Click Save. You are returned to the Manage Vaccinations screen where you will see the "Completed Vaccination" you just added in the center grid, along with a confirmation message at the lower left corner of the screen.

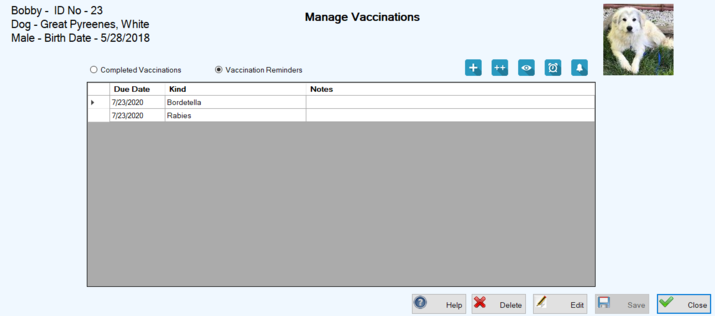
If you select "Vaccination Reminders" above the grid, you will see the automatic reminder that was created when you entered a future date in Step 9 above. (NOTE: Learn more about this in the REMINDERS section of the User Guide.)
-
Perform Steps 1 through 3 above under Adding a New Completed Vaccination for an Individual Animal to reach the Manage Vaccinations screen for the selected animal.
-
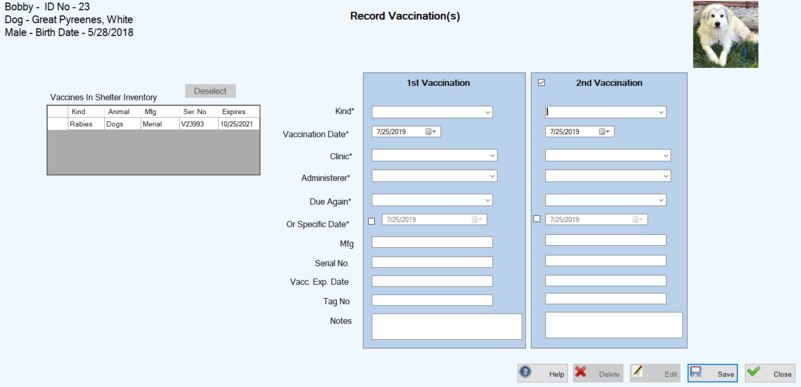
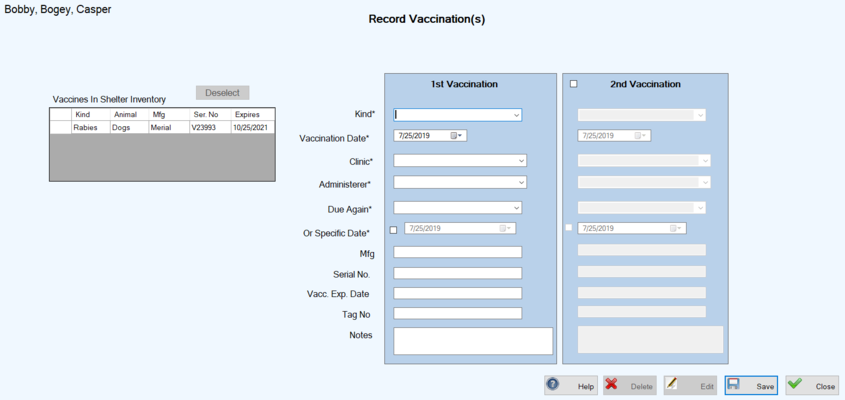
Click the Add Multiple Vaccinations button (
 ) to reach the Record Vaccination(s) screen. This is identical to the screen for adding a single vaccination except it has a "2nd Vaccination" section for recording a second completed vaccination.
-
Perform Steps 5 through 10 for Adding a New Completed Vaccination for an Individual Animal to add the "1st Vaccination."
-
To add the "2nd Vaccination," click the checkbox at the upper left corner of the "2nd Vaccination" section to activate the data entry fields.
-
Perform Steps 5 through 10 for Adding a New Completed Vaccination for an Individual Animal to add the "2nd Vaccination."
-
Perform Step 11 for Adding a New Completed Vaccination for an Individual Animal to save both completed vaccinations. The results look much the same as in Step 11 above except that two vaccinations have been added to the animal's record, along with multiple reminders if your "Due Again" selection is anything other than "None."
Top of page
-
On the TYR Home screen under Modules, click Animals to open the Manage Animals screen.
-
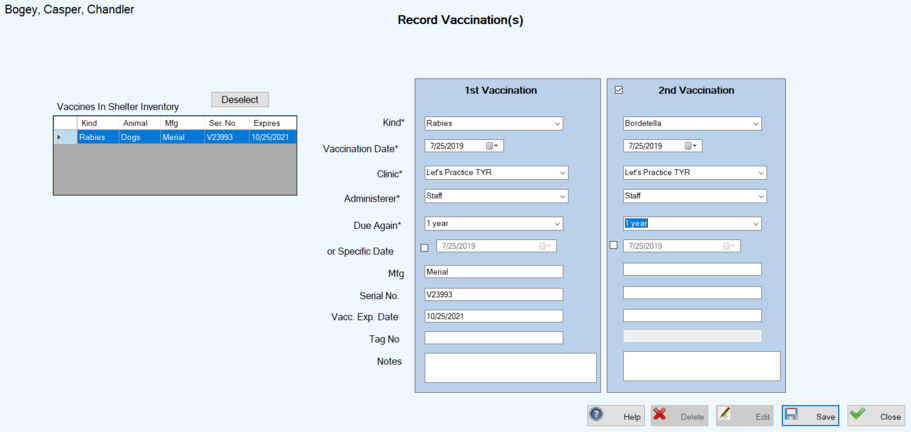
In the center grid, select the animals that received the vaccination(s):
TO SELECTDO THISMultiple animals adjacent to each otherClick the cell to the left of the uppermost animal you want to select, hold down the Shift key on your keyboard, and then click the cell to the left of the bottommost animal you want to select.Multiple animals not adjacent to each otherClick the cell to the left of the uppermost animal you want to select, hold down the Ctrl key on your keyboard, and then click the cell to the left of each additional animal you want to select.
Note: Multiple animals must be the same type (e.g., all dogs or all cats), so look at the Animal column in the center grid when making your selections.
-
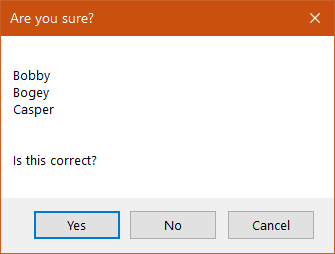
On the right side of the screen under Animal Health, click the Vaccinations button. A confirmation popup appears, displaying the names of the animals you selected.
-
If these names are not correct, click No to return to the Manage Animals screen to repeat Steps 2 and 3.
If the names are correct, click Yes to continue. The Record Vaccination(s) screen appears, allowing you to record one or two vaccinations for all selected animals whose names appear in the upper left corner of the screen. (Note: The identical vaccination information you enter and save on this screen will be applied to the records for all selected animals, including reminders.)
-
Click Save. You are returned to the Manage Animals screen where the selected animals are still highlighted and the confirmation message "Vaccinations for multiple animals saved" appears in the lower left corner of the screen. (Note: To view the results of the steps in this procedure, select one animal at a time and click the Vaccinations button to see the Manage Vaccinations screen.)
-
On the TYR Home screen under Modules, click Animals to open the Manage Animals screen.
-
In the center grid, select the animal whose vaccination you want to edit by clicking the cell at the farthest left on the row containing the animal's information. (Note: You can edit only one vaccination for one animal at a time.)
-
On the right side of the screen under Animal Health, click the Vaccinations button to open the Manage Vaccinations screen.
-
With "Completed Vaccinations" selected above the center grid, double-click the cell at the farthest left on the row containing the vaccination information to open the Edit Vaccination screen.
-
Make the desired change(s) and click Save. You are returned to the Manage Vaccinations screen where you will see a confirmation message at the lower left corner of the screen. If you edited information that appears in the columns in the center grid, you will also see those changes.
-
On the TYR Home screen under Modules, click Animals to open the Manage Animals screen.
-
In the center grid, select the animal whose vaccination you want to delete by clicking the cell at the farthest left on the row containing the animal's information. (Note: You can delete only one vaccination for one animal at a time.)
-
On the right side of the screen under Animal Health, click the Vaccinations button to open the Manage Vaccinations screen.
-
With "Completed Vaccinations" selected above the center grid, click the cell at the farthest left on the row containing the vaccination information.
-
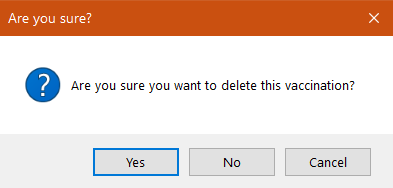
Click the Delete button. A confirmation popup appears.
-
To complete the deletion, click "Yes." You are returned to the Manage Vaccinations screen where the deleted vaccination has disappeared from the center grid and a confirmation message appears in the lower left corner indicating that the vaccination and any related reminder has been deleted.