Adding & Managing Animal Records
When animals come into your care, you need to create and maintain records for those animals. TYR enables you to create new animal records in three ways:
-
A single screen to create a record for an individual animal
-
A single screen to create multiple records for a group of animals such as a litter of kittens or a flock of birds
-
An "express entry" screen to create separate records for two animals at once
To Add a Single Record for One Animal or Multiple Records for a Group of Animals
-
On the TYR Home screen under Modules, click Animals. The Manage Animals screen opens.
-
Click the Add New Animal button (
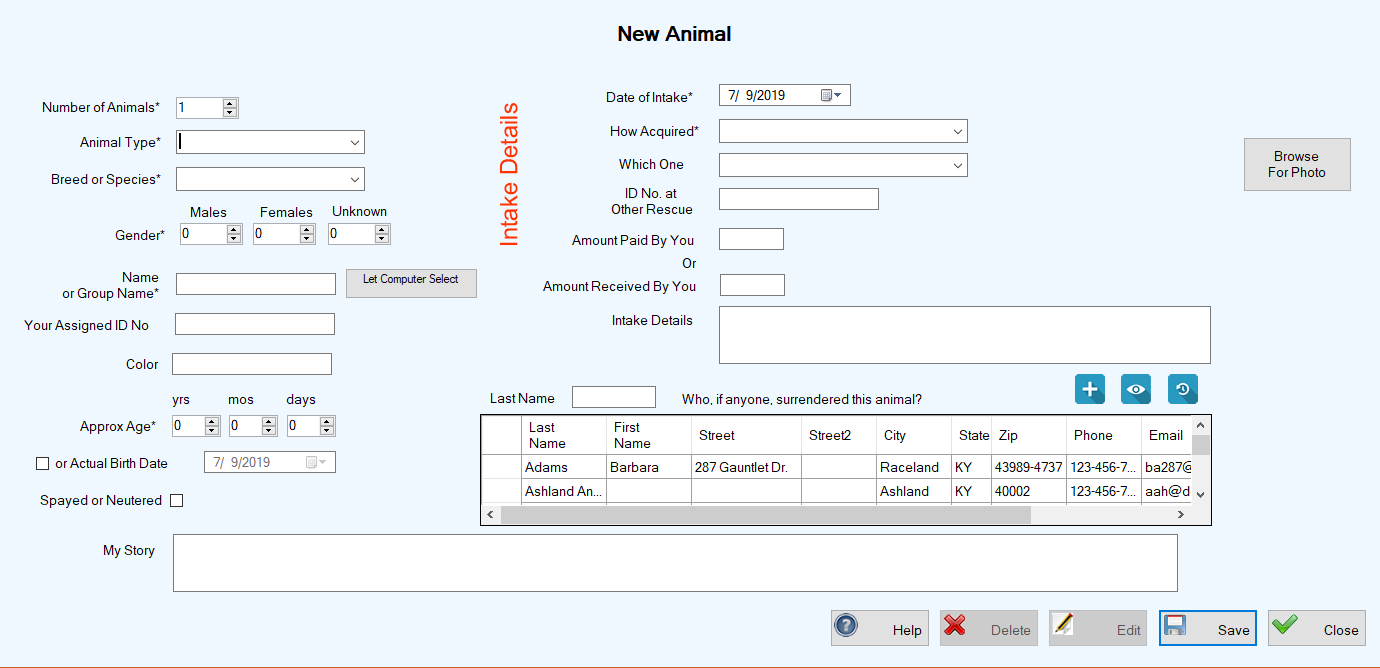
 ) at the upper right. The New Animal screen opens.
-
Number of Animals: Enter Number of Animals by typing in the number or using the up and down arrows to increase or decrease the number.
-
Animal Type: Select the Animal Type from the dropdown list. (Note: The selections in the dropdown list come from the Animal Types you set up when you customized your system. If the Animal Type you need is not in the list, add it by following the procedure for Creating & Managing Animal Types.)
-
Breed or Species: Select the Breed or Species from the dropdown list. (Note: The selections in the dropdown list come from the Animal Species you set up when you customized your system. If the Animal Species you need is not in the list, add it by following the procedure for Creating & Managing Animal Species.)
-
Gender: Enter the Number of Animals of each Gender (Males, Females, and/or Unknown). (Note: For a single animal, the entry will typically be Males 1 or Females 1. For a group of animals, you might need to make entries in all three fields.)
-
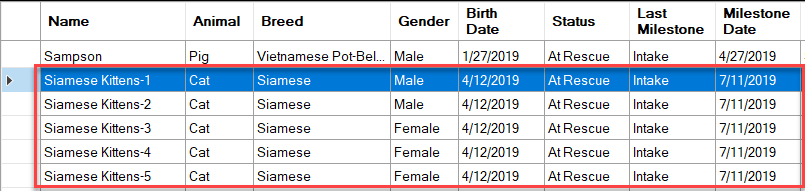
Name or Group Name:- For an individual animal, type in the animal's name or click the "Let Computer Select" button to let TYR make a random selection of a name according to the gender you entered in the field above.
- For a group of animals, type in a name for the group. (Note: TYR will make the animals' names unique for the individual records it creates for the group by attaching a hyphen (-) and a sequential number to the group name. For easier selection of the group of records when entering procedures, medications, etc. for these animals, you can leave the names like this. If at some point it becomes necessary to separate an animal from the group and give it a unique name, you can edit the record for that animal.)
The result will look something like this:
-
Your Assigned ID No (optional): Enter the animal's ID number in the Your Assigned ID No field only if you already have an animal numbering system that you want to retain. With TYR, there is no longer any need to keep a separate ID list because TYR automatically assigns a unique ID number to every animal when you create the records.
-
Color (optional): Enter the Color of the animal if you want it to appear on animal reports.
-
Approx Age or Actual Birth Date: Select or type a number in the "yrs", "mos", and "days" fields for the Approx Age (approximate age) if you don't know the animal's actual birthdate. If you know the actual date of birth of the animal, select the "or Actual Birth Date" checkbox and type in, or use the date picker to select, the date.
-
Spayed or Neutered: Select this checkbox if you know the animal has been spayed or neutered.
-
Date of Intake: Select or type in the date you acquired the animal.
-
How Acquired: Select from the drop-down list you created when you were setting up Animal Acquisition Ways in TYR Customization, or type in a different way if it isn't in the list. (Note: If you want the new Acquisition Way to be added to your saved list, click the "Add to List" checkbox.)
-
Which One: This field requires an entry when you select Other Rescue/Shelter/Sanctuary in Step 13 above. When required, type in or select the name of the organization.Note: The selections in the drop-down list come from a selection you make when setting up a Company or Organization record:

If you type in a new name that you want to be available in the drop-down list in future, follow the instructions for Adding & Managing PCO Records.
-
ID No. at Other Rescue: If the animal came to you from another rescue where it had a number, enter that number here. It will provide a link back to the animal’s former life.
-
Amount Paid By You Or Amount Received By You: If you paid a fee to acquire the animal or received a donation for taking in an animal, enter the amount in the appropriate field, following the data entry rules for monetary amounts. (Note: The system will allow to make an entry in one field or the other, but not both.)
-
Intake Details: Type in any notes you wish to record about how you acquired the animal. This information is for internal purposes only and will not be available to the public.
-
Who surrendered this animal?: If the animal was acquired via Owner Surrender, indicate the name and address of the person(s) giving up the animal by selecting a record from the grid. (Note: For some of the other acquisition ways, you can also select someone but it is optional.)
To make a selection, scroll down the grid or enter the last name in the Last Name search field above the grid to filter the list, and then click the cell at the farthest left on the row containing the name to highlight the entire row.
(Note: If you do not find the name in the grid, click the blue Add New PCO ( ) button and follow the instructions for Adding & Managing PCO Records. Use the blue PCO Details (
 ) and PCO History (
 ) buttons above the grid to see more information about a selected person.)
-
My Story: Type in any information that will provide important background and highlight the animal's best characteristics when you are trying to attract adoptive parents. Whatever you type here will appear on TYR's animal reports.
Here is an example:My name is Bingo and I’m a wonderful, 5-yr old, neutered beagle. I am 25 pounds, heartworm negative, vaccinated, and microchipped. I love the company of cats, humans, and other dogs. I also love to go for rides in the car and play fetch. Swimming is not my thing though. I was surrendered by my previous owner because he was going into assisted living and they wouldn’t allow pets. We were both heartbroken. My dream is to find another human to love. Please come and meet me. -
Browse for Photo: Click this button to browse your computer for a photo to attach to the record so that it will appear on most TYR screens related to this animal.
-
Click Save.
-
On the TYR Home screen under Modules, click Animals. The Manage Animals screen opens.
-
Click the Add Multiple Animals (
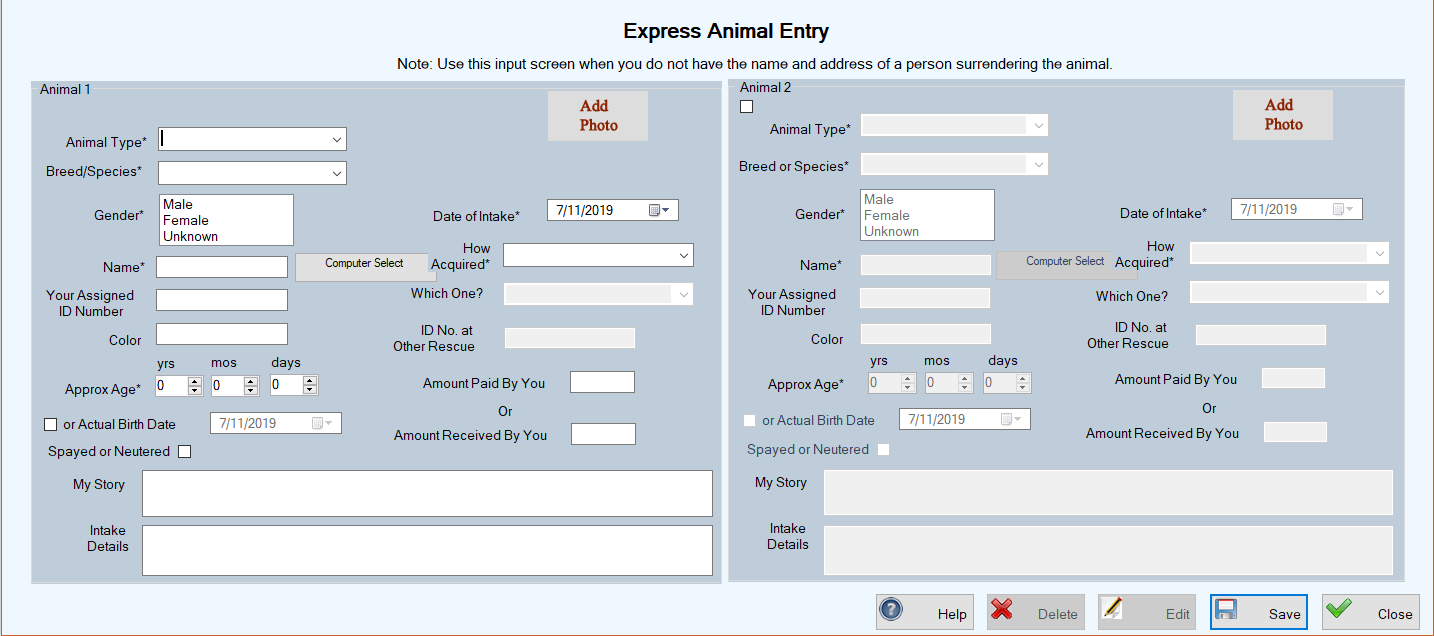
 ) button at the upper right. The Express Animal Entry screen opens.
Important Notes:
When you compare this screen to the New Animal screen in Step 2 above, you will notice that it contains most of the same fields, but there are a few items missing:
- Number of Animals field (not required because the Animal 1 and Animal 2 sections only allow a single animal record each)
- Owner Surrender selection in the How Acquired drop-down list
- grid to select Who surrendered the animal
As the note at the top of the screen directly under the its title implies, DO NOT use this screen to create a new animal record when you have the name of a person who is surrendering the animal because that important information should become part of the both the animal's and the person's records. (Adding the Owner Surrender information on the single entry screen above automatically makes this information part of both the animal and person record.)
3. For Animal 1, follow the directions in Steps 4 through 17 for Adding a Single Record for One Animal. (Note regarding Step 7 above: "Group" does not apply in this case because this new record must be for a single animal only.)
4. Follow Steps 19 and 20 to complete the first record.
5. To start the second record, click the Animal 2 checkbox at the top of that section to activate the fields.
6. Repeat the steps you just completed for Animal 1, and then click Save to save both new animal records.
Top of page
Top of page
To Edit an Animal Record
-
On the TYR Home screen under Modules, click Animals. The Manage Animals screen opens.
-
On the Manage Animals screen, double-click the cell to the immediate left of the row containing the Animal you want to edit. The Animal Details screen opens with all fields ready for editing.
-
Make your desired changes.
Important Note: If you need to flag this animal for some reason, e.g., unadoptable, select the Flag checkbox and enter a Reason. The flagged animal will become highlighted in a unique color in the center grid on the Manage Animals screen. (See Changing Your Preferences regarding highlight color for flagged items.)
-
Click Save. The Animal Details screen closes and you are returned to the Manage Animals screen, where you can see the changes you just made, and a "Modified" confirmation message at the lower left.
Top of pageTo Delete an Animal Record
-
On the Manage Animals screen, select the row containing the animal record you want to delete by clicking the empty cell at the farthest left of the row.
-
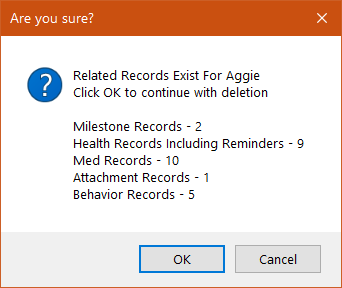
Click the Delete button. A popup window appears to confirm that you really want to delete the record. As shown in the image below, the system presents you with a list of related records to remind you that you might want to take a look at those records before you delete the animal.
-
To complete the deletion, click OK. You are returned to the Manage Animals sceen, where the animal you deleted is gone from the center grid, and a confirmation message appears in the lower left corner.
Top of page